
Common Mistakes & How To Fix Them
TL;DR: Nearly every failed Gloop! bond is one mistake wearing two costumes: not enough Gloop! or not mating fast enough. Keep both surfaces wet, beat the 30–60 second clock, twist on contact. Half-dried? Re-wet with fresh Gloop!. Fully cured and failed? Sand back to virgin plastic and go again.
The Two Mistakes (that are secretly one mistake)
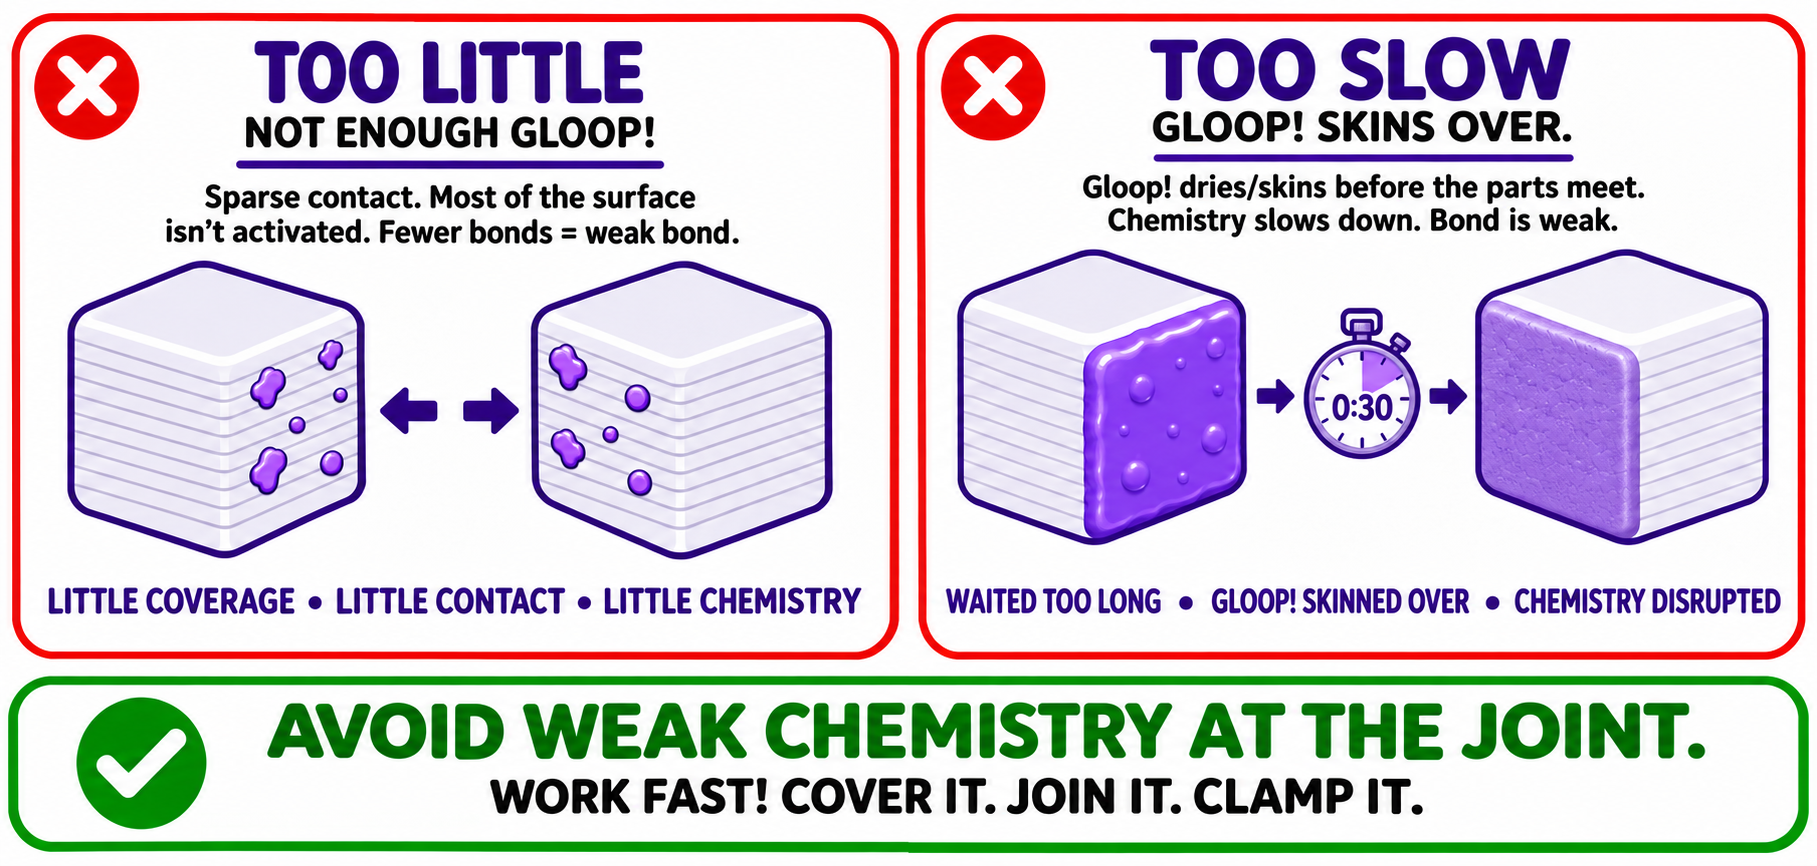
Mistake #1: Not enough Gloop! Thin, stingy coats skin over and spend their reactive chemistry before the parts ever meet. The result looks bonded but pulls apart with sad little contact patches... the joint equivalent of a high-five that mostly misses.
Mistake #2: Not bonding fast enough. Gloop! reacts immediately. Your working window is 30 to 60 seconds. Watch the surface: shiny and clear = live and reactive; matte and cloudy = a skin has formed and the monomers are de-complexing and crosslinking without you.
Both roads lead to the same place: not enough live chemistry at the joint when the parts meet. Both surfaces fairly wet + parts mated inside the window = full-strength weld.
Reading the sauce: your built-in status indicator
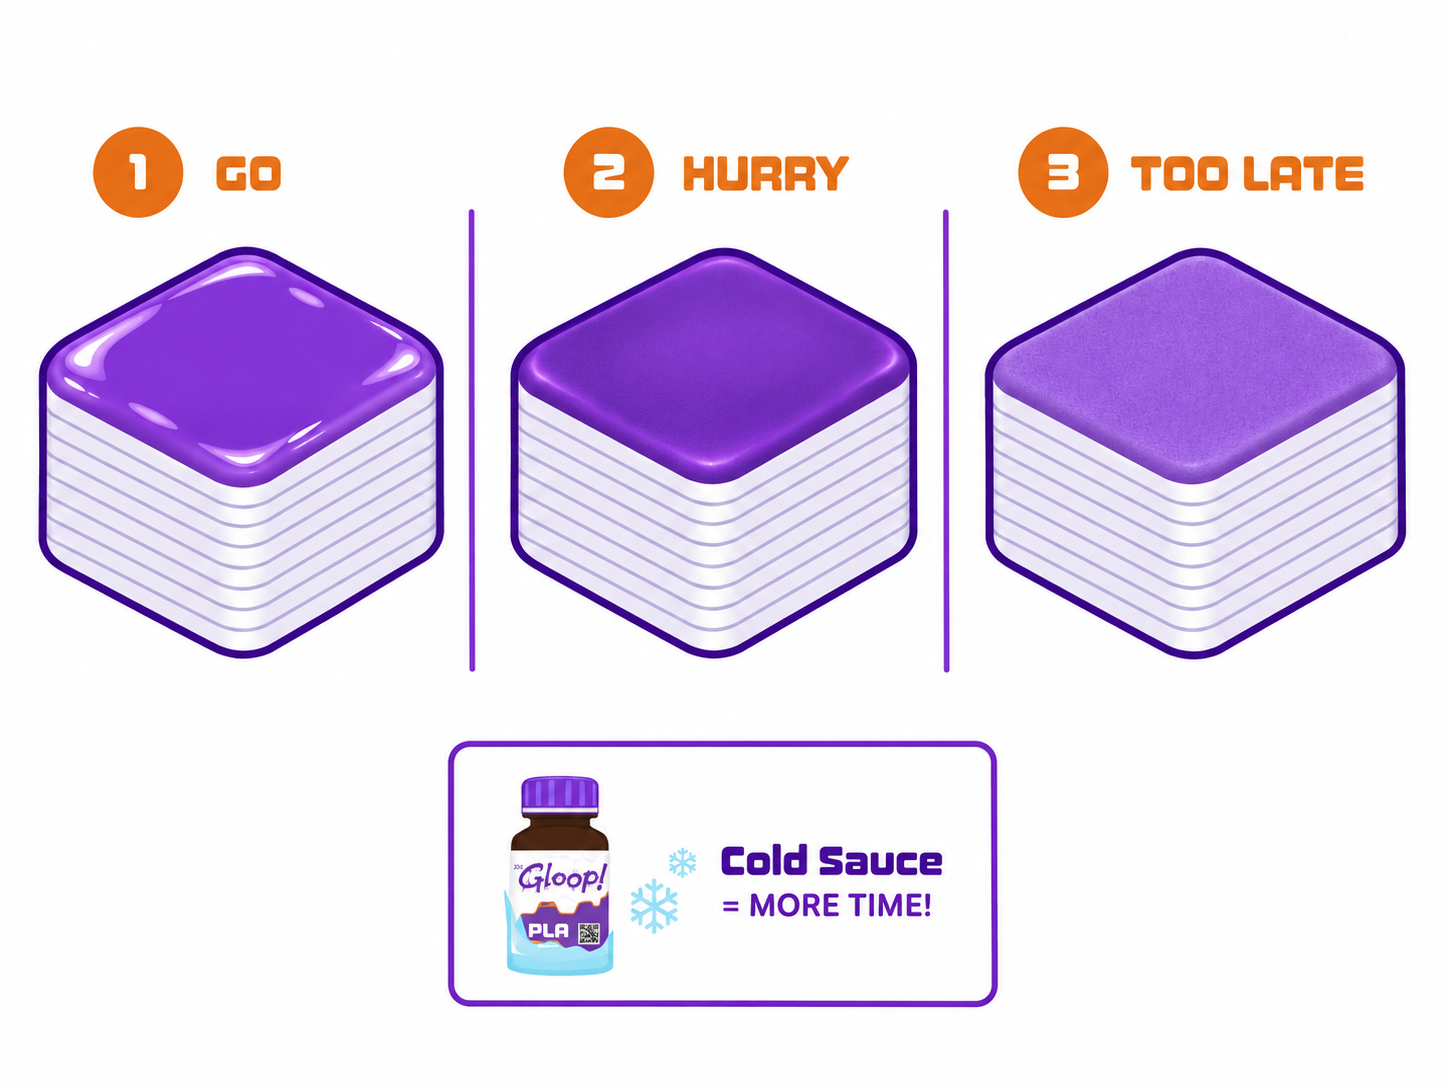
Shiny / clear → reactive, ready, GO.
Going matte / opaque → skin forming, clock running out.
Matte and dry to a gloved touch → that layer has retired from active duty.
Pro tips for buying time: cool your Gloop! A cold bottle buys you extra seconds on tricky assemblies... place your Gloop! bottle in a cup of ice water 10–15 minutes before use. Stage your parts within arm's reach before you slather, and on big faces keep re-wetting your dollops as you work (Guide 4).
Rescue missions
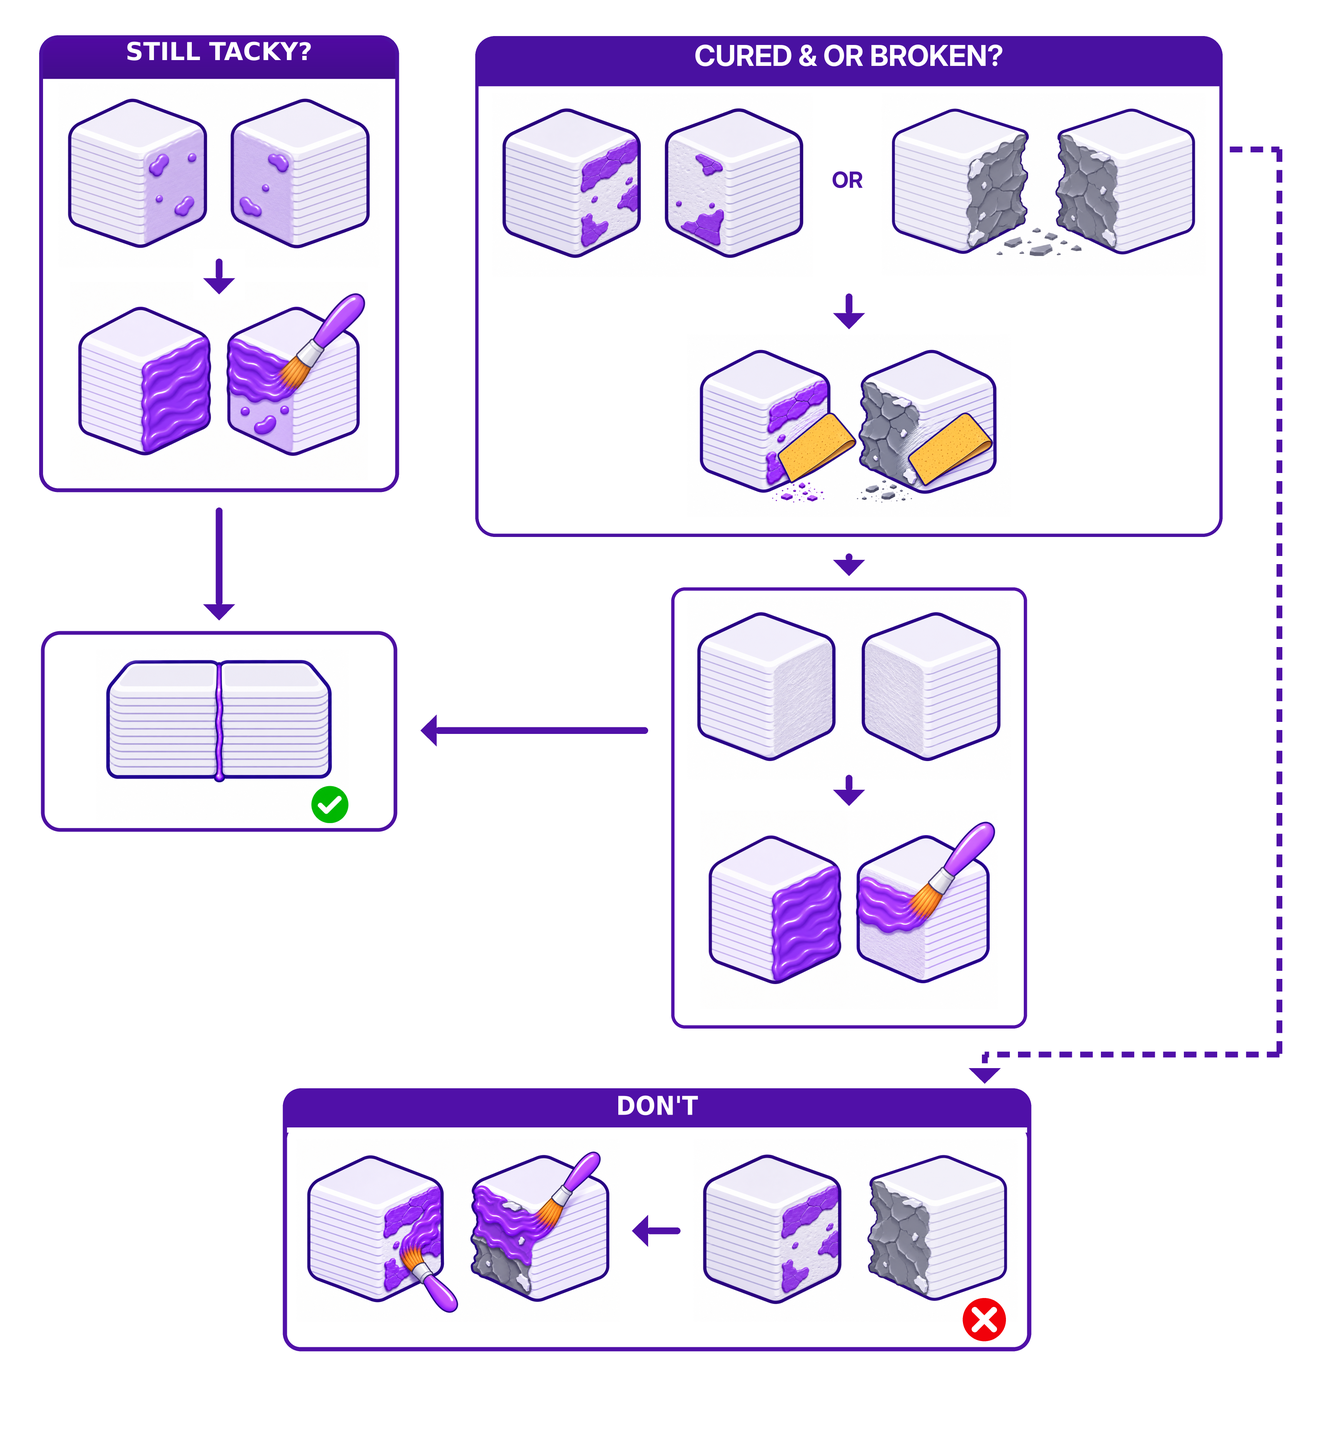
Sometimes, we all make mistakes and that Gloop! bond isn’t holding so well or maybe its your first time using Gloop! and you’re having some difficulties getting the bond to take. Perhaps even you used a different adhesive at first such as an epoxy or cyanoacrylate and you need to perform an emergency repair. Fear not! We’ve got a helpful little flow diagram below to best walk you through the process.
Caught it while tacky?
The most common problem our customers experience is taking too long to apply the Gloop! and mate the joint. This results in the surface of the Gloop! becoming inactive and things just falling apart or not sticking super well.
First, look at the bond. Do you only see a couple areas where the parts touched? This is a good indicator you didn’t use enough Gloop!. And if you caught it soon enough, well, your in luck! You can revive it! Slather a fresh coat of Gloop! right over it and mate immediately. Remember to work fast and its okay to be a bit messy. It’s Gloop! after all. The fresh solvent re-opens the skin and gets most of the chemistry back in the game. Not 100% of a perfect first try, but close enough for most parts.
Repairing a broken joint?
Used Gloop! and it still let go?
This can happen for a variety of reasons, but the most common one is that you simply took too long to apply your Gloop! and make the joint a mated pair. This means that all of that reactive chemistry evaporated before the ceremony and there’s no spark left to get things “sticky”. Here's the hard truth: cured Gloop! is finished chemistry. Fresh Gloop! poured over a cured layer only partially re-dissolves it, and Gloop!-to-cured-Gloop! is weaker than Gloop!-to-plastic. The only way to fix this is to remove the layer of cured Gloop! and try again.
Replacing a different adhesive?
Lets say you have this awesome 3D print and everything about it is just perfect except for the fact that a small tumble caused the joints to explode because you previously used a different adhesive… It’s okay, Gloop! can fix your print! But remember: Gloop! only works for the polymer it was engineered for. Other adhesives are built out of different polymers and Gloop! can’t speak their language so there’s no way they can link up. You’re going to have to remove the old adhesive first before Gloop! will be able to bond to the substrate.
Repairing a failed joint regardless of the cause can only be done properly by sanding the joint back to virgin plastic. Remove the old cured layers of Gloop! or other adhesives entirely, then re-bond like it's day one (Guide 2). This time, try more sauce and faster hands!
Bonus mistake: Glooping over paint or old glue
Gloop! welds plastic. Paint is not plastic. That crusty layer of failed super glue is also not plastic. Slather over either one and the chemistry never reaches the polymer... at best you get a weak bond to the coating, and some paints will stop Gloop! from curing entirely, leaving a sticky, gooey mess that's nearly impossible to clean up. Sand back to bare plastic first, every time. (More on painting and finishing in the FAQ.)
The pull test, for the skeptics
Try it yourself with two scrap cubes: bond one pair with a thin skimpy coat, and one pair properly wetted and twisted. Wait, then pull. The skimpy pair pops apart showing its sparse little patches. The proper pair? Within seconds of mating it already fights back, and after full cure, the plastic usually gives up before the weld does. It's Science! Not Magic…
That's the whole curriculum, Gloopie. Back to the How-To hub, or go forth and slather that Science Sauce. The Robot Overlords are pleased. (Woo Hoo!)